Saturday, September 27, 2008

OFF MY ROCKER...

...just long enough to take a few pictures of it, anyway. Found this ladies' rocker at a tag sale one day - outside under a covered porch, full of dust and cobwebs. It had been painted leaf green at one time (not sure what the original color was), but now it was all chipped and grimy. The cane seat was damaged as well as painted. I looked her over and checked to make sure the joints were all secure. She was so petite and demure that I just had to have her. The next thing I know she was in my car on her way home.

First order of business, a nice bubble bath. Now all she needed was a fresh coat of paint and a new seat. I thought this teal blue was just her color with a delicate little frill painted across the top and back (she has to look good coming and going, you know).

Of course, every ladies' rocker needs a skirt. I found the perfect fabric with some blue tassel fringe to match. Don't you just love that long ruffle and those ties? So feminine!

One outfit won't do! How about something casual? So I outfitted her with a new seat. I traced out a shape and Frank cut one out of plywood, probably about 3/4" thick (so screws could be set in from underneath without poking through the cushion). Then I applied a layer of foam rubber, batting, and fabric. Frank secured it to the chair and she was ready to rock the night away. I just love this fabric. I've used it to make some dining room valances. I still have some left that I've been saving. Hmmm... maybe I should use some to make a pretty apron. Now that's an idea!
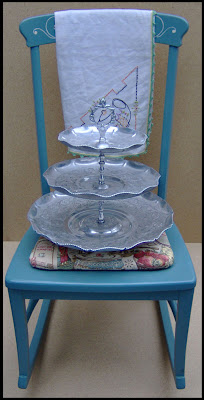
Here she is proudly holding a few of her friends. A vintage three tier dish, also rescued from a tag sale, as well as a vintage hand-embroidered table topper, a gift from my sister.

Close-Up Of Embroidery

S.W.A.K.

ONLY 4 GUESSING DAYS LEFT!

Friday, September 26, 2008

A ONE QUILT SHOW

Here's a quilt that I made years ago - except that I only just finished it yesterday. All I had to do was stitch down one more side of binding. So what happened?!! I only know that it ended up folded (as you can see from the lines) and tucked away. I have always loved this quilt. It has a vintage look to it. Now I just need to throw it in the washer and dryer and make it all fluffy and soft. It's not very large - just 50" x 50". Perfect the upcoming chilly nights while watching an oldie but goodie movie on TCM.

I picked this backing fabric just because I liked it.

I'm not bragging, but this quilt is completey hand-pieced and hand-quilted with some old buttons tacked on just for added texture and interest. Hey, look at those stitches! Not bad, if I do say so myself! :) I love to do piecework because it means you don't have to be chained to a machine, but maybe if I had one of them new-fangled ones... Honey, are you reading this? Christmas will be here before you know it. Hint, hint, hint.

S.W.A.K.

HEY, GET YOURSELF OVER HERE AND ENTER!
ONLY 5 GUESSING DAYS LEFT

Wednesday, September 24, 2008

SERIOUSLY CUTE STUFF

I made this clothes tree for Frannie when she was just a baby and she hasn't outgrown it yet. I went to one of those big box hardware stores and purchased an unfinished newel post with a ball cap. My husband, Frank, made the base for the clothes tree. The pattern for the base came from the Martha Stewart Magazine way back in 1999, and the pattern is still available today here. They are actually supposed to be wall brackets, but we did our own thing with it. I enlarged the pattern to the appropriate size and Frank traced it onto some wood and cut it out with a jigsaw and sanded it down. He also attached them to the newel post for me. I did the decorative part. Of course, it's Folk Art baby pink, to match the rest of Frannie's room, with yellow, white and black accent colors. I decoupaged tiny black and white striped pieces of paper around the different sections for a little extra zing. Mary Engelbreit paper doll clothes were decoupaged on both the top and bottom. These doll clothes were from her magazine, a new set of clothes is included in each issue - I've kept them all - you never know how you will use these things. I've also used them to decorate a clothes hamper, but that's another post. At the top, Frank attached a clothes hook right over each outfit. I am really happy with the way it turned out and Frannie just loves it! So here are lots of pictures so you can have a really good look at it.

Side 1 - Complete

Side 1 - Top

Side 1 - Bottom

Side 2 - Top

Side 2 - Bottom

Side 3 - Top

Side 3 - Bottom

Side 4 - Top

Side 4 - Bottom

Did I mentioned that there are polka-dots on the top? :)

S.W.A.K.

IT'S 10 PM - DID YOU ENTER YET?
ONLY 6 GUESSING DAY LEFT

CRAFTING WITH CHILDREN

(More photos from the archives)

Sometimes I volunteer at Frannie's elementary school, you know, working at the book fair, chaperoning on field trips, baking and selling at their annual election day bake sale, and being a room parent (among other things), but what I love most is teaching the children a new craft.

This was our spring bonnet craft. We took really large circles of paper and glued big doilies underneath to represent lace. Then the girls decorated the tops with paper flower shapes. Crepe paper streamers were used as ribbons to tie under their chins. I think they're ready for a stroll down Fifth Avenue!

Here's what they look like from the back. This would make a really fun craft for a girl's birthday party. (Can you tell which one Frannie is? I'll give you a hint - she's the one with the polka-dot thermos - but you knew that already, didn't you?!)

Now, how about some boater hats for the boys? I constructed the basic hats for the boys because they were a little more difficult. They are made out of cardboard rounds for the brims (the kind bakers use to put cakes on) and poster board for the crowns. The boys did all the decorating. Don't they look dapper!

Or maybe a bouquet of flowers is more your thing. For Valentine's Day we made tissue paper nosegays for the children to bring home for their moms. We used tissue paper rounds that I pre-cut, pipe cleaners, small round doilies as the nosegay holder, and ribbon. Now that's sweet!

The children get so excited when they see me come into the class because they know we are going to make something special. They have no idea how happy they make me! They're already asking about what we'll make this Halloween. I'd better get busy!

S.W.A.K.

SPEAKING OF HALLOWEEN...
ONLY 7 GUESSING DAYS LEFT

Tuesday, September 23, 2008

MARTHA STEWART BLOG CONTEST

Enter the Martha Stewart blog contest to be featured on the one and only Martha Blog. I did!

S.W.A.K.

TOPIARY

I need to take more photos of some recent projects, so for tonight I decided to look in the archives. Look at what I found! It's a spring-time topiary I created for Frannie's kindergarden class (she's in second grade now). Here are the components: Paper punches, pearl headed pins, dowel, clay pot, ribbon, paint, and two styrofoam balls (one on top and one in the pot - holds the dowel in place).

The pot was painted yellow on the inside, pink on the upper edge, and robin's egg blue on the bottom. Mary Engelbreit baby animal images were decoupaged all around.

The flowers on the topiary were made out of three different flower-shaped punches and held in place with pearl headed pins in a variety of colors.

When complete, it was filled with pink shredded crinkle paper and pastel foil wrapped chocolate eggs. It was a big hit!

I forgot to mention that I put polka-dots on it!

S.W.A.K.

STEP RIGHT UP AND TAKE A CHANCE!
ONLY 7 GUESSING DAYS LEFT

Sunday, September 21, 2008

GETTING STARTED WITH BEAD KNITTING

If you can knit, you can do bead knitting! It's that simple. All you need are seed beads, needles, thread, pattern, and purse frame. But I'm going to warn you, it's very addictive!

1 Hank of Size 11, Silver-Lined Seed Beads

First, let's talk a little bit about the beads. There are lots of sites where you can order beads. I mostly purchase from Fire Mountain Gems, mainly because they have a large assortment and their prices are good. They'll also send you a huge catalog that you can drool over! Seed beads come in a wide variety of sizes, but most patterns call for size 11. They are also available in lots of colors and finishes. I just love the silver-lined beads because they really sparkle, but you can also get them in lustre, polished, translucent, matte, metallic, pearl, etc. If you opt for the translucent beads, you must be careful as to what color thread you use, because that thread will show through the beads and might alter the color of your finished piece. IMPORTANT TIP: Make sure you purchase beads that are sold by the hank! You do not want to buy loose beads because then you will have to string each bead individually - that could take forever - but hey, whatever turns you on. :) When you purchase by the hank, you can easily transfer your beads from the hank to the knitting thread.

1 Pair of Size 0000 Double-Pointed Needles

Next up - needles. Okay - you need to get used to knitting with these needles - you have to develop a callous on your left pointer finger (if you're a right-handed person). These needles are size 0000 and are very fine. The pair shown in the above photo was purchased from Bag Lady. They are inexpensive, but you need to put some rubber point protectors or small little corks on the ends to keep your knitting from falling off. If you'd like to make them more decorative, glue some pretty beads on the ends.

Size 8 Pearl Cotton Thread

Onto the thread. Most patterns call for size 8 pearl cotton (or crochet) thread. I know of three brands: Anchor, DMC, and Finca Perle Cotton (the Finca Perle Cotton is available at Bag Lady). These threads come in all sorts of scrumptuous colors. You can either pick a thread to match your beads, or something complementary or contrasting. Your choice.

Patterns

Moving right along - patterns. There are lots of bead knitted purse patterns out there, you just have to look for them. Try Bag Lady or Barb's Bags for starters. It goes without saying, that for a beginner, simpler is better. After a while you'll create your own patterns, believe it or not! :)

Purse Frames

Last but not least - purse frames. If you're going to make a beaded purse, you have to have a purse frame to go with it. Silver-tone, gold-tone, silver-plated, gold-plated, antique finish, simple, ornate - whatever suits your fancy. I like them all. You'll find some very nice inexpensive frames and some extremely expensive ones too. Two on-line suggestions for purse frames are, again, Bag Lady and Lacis. If you're making an heirloom piece, go all out and get a really nice one. Most of them have holes around the frame where the knitted piece is sewn onto. We'll talk about how to do this in a later post.

Make A Loop

Now it's time to transfer the beads. Start by gently pulling out one end of a bead strand and then make a loop near the end. Refer to photo above.

Transfer Beads

Now, take the end of your thread and insert it into the loop, leaving about a 2" tail. Pull the loop taught. Gently slide the beads from one thread to the other. You did it! Now do this again about seven more times. It's best not to transfer more than 8 strands of beads at a time because you don't want to weaken the knitting thread. Keep pushing the beads down the knitting thread and leave a generous amount of plain thread for the beginning knitting.

In almost any pattern you find, there are several rows knitted at the beginning and end of the purse that do not have any beads in it. This is because you need a section of plain knitting to attached to the frame. You can see in the above photo that I have already knitted about 14 rows. Four rows were just knit, then the pattern began. It goes like this: k3, (s2, k2)* across, ending s2, k3. That means: knit 3 stitches, slip 2 beads, knit 2 stitches (repeat across), slip 2 beads, ending the row with knit 3 stitches. Now wasn't that easy? :)

Sliding Beads Up To The Needles

The next row calls for slipping 3 beads. In this photo you can see where I knit the first 3 stitches and I'm now getting ready to slip 3 beads. Take 3 beads and slide them up to the end of the thread closest to the needles.

Next, insert your needle and knit the next two stitches. Don't knit too loosely, as your beads may slide around too much.

Here's what it looks like from the back. Actually, the front and back are exactly the same. Now follow your pattern and keep going. Most purses are worked in one piece. Work the pattern all the way to the bottom, then reverse it and work it all the way back to the top again. You might find an occasional decrease or increase at the edges, but mainly the pattern takes its shape from the amount of beads you slip. One more tip - when you run out of beads, make sure you have enough to complete a row - never end in the middle of a row because you won't be able to hide your threads - then cut your thread, leaving a nice tail, transfer more beads to the thread, attach to your knitting and continue on. You're going to love it! :)

Here are some of my current purses in progress:

This was my second purse. It is completely knitted, but I haven't attached it to a frame yet. I believe these beads have a little sheen to them, but they are not silver-lined. This purse also has a bead knitted gusset for each side to give the purse a little depth. It measures about 7" long.

Here's a blue one. It is a different pattern from the black. The beads are silver-lined. It's about 6-1/2" long.

White bridal purse. It's made with pearl beads that have a polished finish. The top of the purse has a bead between each stitch. This is my own pattern (I told you it's possible to create your own after you get the hang of it). I'm not exactly sure how long it will be yet. I'm also going to put beaded fringe on the bottom when it's complete. Can't wait!

Yellow silver-lined change purse - really sparkly! Knitting is done - have to attach to frame. A very happy color!

Olive green, polished beads. Change purse - knitting complete - needs frame. These beads have a real vintage look to them.

And there we have it! When I get the Halloween contest/giveaway purse knitted, I'll show you how to attached it to a frame. I'll bet you can't wait! :)

S.W.A.K.


YOU HAVE TO BE IN IT TO WIN IT!
ONLY 9 GUESSING DAYS LEFT